As we will be moving to California shortly, we thought it best to experience one more Oregon camping excursion. With that in mind we visited 2 Oregon state parks close to Portland. After a long week at work we decided to visit Silver Falls state park first:
We arrived during nightfall and found an open site that was close to all the amenities:
My wife took some excellent photos of the camper but unfortunately it was raining and the house battery was completely dead so it was off to Salem Oregon to look for another battery and campsite to stay for the night:
We decided to change parks to see if there was less rain - here is my wife's collage of our trip between campgrounds:
The next day was spent at Champoeg state park which has great facilities and wonderful camping attractions:
This experience represents the first time we used our amazing "BusDepot" side awning, courtesy of our parents Christmas present, which worked excellent and added 3 times the usable covered space!
After a quick learning experience we put the awning together in approx 15 minutes but should have it down to 5 minutes next time.
We had an issue with the Kinetik house battery not charging properly so utilized a spare riding lawn mower battery that I had to power the the "house" electronics - here are a few shots of our camper during the night. This also marks the first camping experience with our new 3 window canvas tent and sleeping in the upper bunk provided an extra 2" or so which made a big difference in comfort when sleeping
Time to enjoy the nature provided at this great campsite.......We first biked to the visitor center to enlighten ourselves about the area:
We learned that Oregon was almost part of Canada (Britain and Hudson's Bay company - Go Canada!) until 1848 when Oregon was finally made into an United States Territory and finally a US state in 1859. Above are some original Hudson's Bay blankets and myself towering over some tiny original settlers!!!Our final day we enjoyed some of the excellent biking trails and met some "friends" along the way
Another great camping experience. We received a few positive comments on our "Westfalia" and new awning from the fellow campers which made us appreciate what a special vehicle we have and called it yet another successful weekend
Thursday, March 28, 2013
Wednesday, March 13, 2013
The day finally arrived and I was able to proceed with one of my final interior transformations. After doing my research, I decided to purchase some black alcantara suede type racing seats for the front as well as a new 9 piece charcoal grey carpet kit.
Here is a shot of the front as it was when we purchased our Westy
As you can see the original theme is brown on brown and my overall goal was to slowly transform into grey/black. The 30+ year old seats were like sitting on concrete blocks and the carpet was not only extremely stained but didn't smell the greatest.
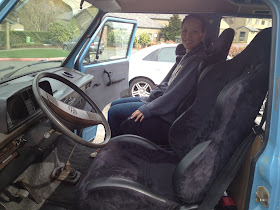
With that thinking in mind, I decided to take my chances on some brand new seats purchased via eBay for $233 including shipping. The seats not only matched my color scheme but are extremely comfortable. The most difficult part of the seat install was making custom seat brackets that would fit properly on the existing swivel seat brackets. After several trips to Home Depot and approx $50 I had created a secure bracket that works great with the sliders provided with the seats. I also had my first experience with an angle grinder to cut the metal to size and smooth out the corners which was great fun.
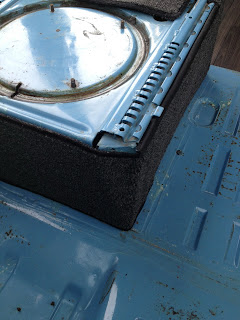
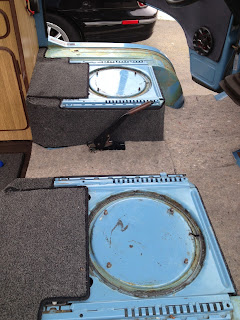
Having the old seats out gave me an opportunity to clean the swivel seat bases and shine them up. Here is a before and after:
Here is a shot of the front as it was when we purchased our Westy
With that thinking in mind, I decided to take my chances on some brand new seats purchased via eBay for $233 including shipping. The seats not only matched my color scheme but are extremely comfortable. The most difficult part of the seat install was making custom seat brackets that would fit properly on the existing swivel seat brackets. After several trips to Home Depot and approx $50 I had created a secure bracket that works great with the sliders provided with the seats. I also had my first experience with an angle grinder to cut the metal to size and smooth out the corners which was great fun.
Having the old seats out gave me an opportunity to clean the swivel seat bases and shine them up. Here is a before and after:
Then it was time to do a test run to make sure my new brackets fit properly and securely
Once the charcoal grey 9 piece carpet kit, ordered from Sewfine Products, arrived via UPS I couldn't wait to get it installed. Huge props to my wife for the tremendous help with installation of the new carpet. Here are the installation shots:
Removing the old carpet was very easy as the 30 year old glue had lost all it's adhesive properties. The original underpad was pretty gross but the underlying metal was in great shape after all the dirt was cleaned away.
I also purchased new insulation and 3 cans of spray carpet adhesive which worked great. Sewfine did a great job of cutting the individual pieces as well as providing detailed on-line installation pictures.
Here is the final product!! I think it looks great and fits well with the overall theme I have been attempting to achieve. There is no more musty smell and I couldn't be happier with the fit and finish of the new carpet. The seats are larger than the stock originals as well as 1-2 inches higher at the base. A smaller steering wheel might be in the future as the leg-room between the seat base is more restrictive now but more than acceptable as they are 100 times more comfortable.
My wife and I are extremely happy with what we have accomplished in 9 months personalizing our camper and look forward to many more years of enhancement and exploration in our future.


